Upgrading the Creality Sermoon V1 3D printer

Table of Contents
We will install OpenWrt on the WiFi box, followed by Klipper with Fluidd (or another UI of your choice). After setting up Klipper, we can add a CR Touch sensor to the printer to significantly enhance its performance.
The installation of OpenWrt and Klipper with Fluidd is based on this tutorial:
Install OpenWrt #
- Format a USB drive to FAT32.
- Download the file
Firmware/OpenWrt_snapshot/openwrt-ramips-mt76x8-creality_wb-01-squashfs-sysupgrade.binfrom the repo. - Rename the file to
root_uImage. - Copy the file to the USB drive.
- Power off the 3D printer.
- Remove the side panel.
- Connect the USB drive:
- My printer came with a USB cable.
- Disconnect the cable from the printer board and connect the USB cable to the WiFi board.
- Use jumper wires to connect power from the printer board to the WiFi box (see the image below) - it’s a bit hacky, but it works.
- Connect the USB drive.
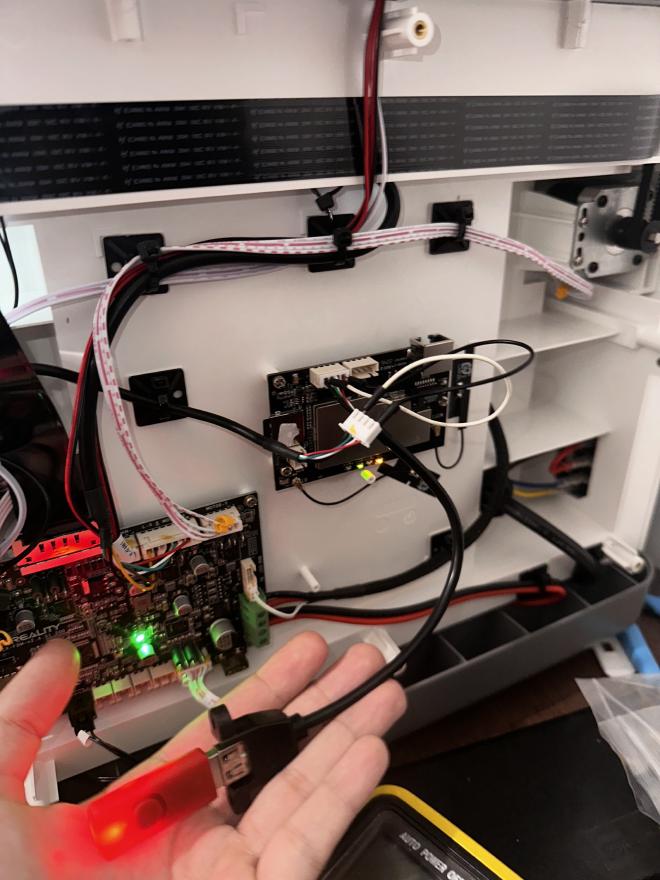
Hack to connect power and USB drive to Creality WiFi box.
- Hold the reset button on the WiFi box.
- Power on the printer while holding the reset button.
- Wait for 6-10 seconds or until the green LED turns on, then release the reset button.
- Wait a few minutes for the flashing process to complete.

Restore Stock Firmware - do this in case things go wrong #
- Download the firmware
Creality__Box_Firmware-V3.03b62from the Creality Website. - Extract the contents of the archive.
- Format the USB drive to FAT32.
- Move the file
root_uImageto the USB drive. - Follow the steps above starting from step 5.
Configure OpenWrt #
- Connect to the hotspot created by OpenWrt.
- Go to
192.168.1.1:81. - Log in with the default username
root(no password). - Change the subnet of the WiFi Box to avoid conflicts with your home network:
- Go to
Network > Interfaces. - Click on
Edit. - Change the IPv4 address to
192.168.3.1. - Click
Save(this closes the popup). - Click on the dropdown button next to
Save & Applyand selectApply unchecked. - Click
Apply unchecked. - Reconnect to the WiFi box hotspot using the new IP
192.168.3.1:81.
- Go to
- Connect the WiFi Box to your home WiFi:
- Go to
Network > Wireless. - On the item
MediaTex..., click the buttonScan. - Find your home network and click on
Join Network. - Enter your WiFi password.
- Check the box
Lock to BSSID. - Create a new firewall zone named
wwan. - Click
Save. - Ensure the field in
Interface Configuration > ModesaysClient. - Click
Save. - Click
Save & Apply. - Go to
Network > Interfaces. - Check the IP of the WiFi box in your home network and save it.
- Go to
Network > Firewall. - Change all parameters of
wwantoacceptand enableMasquerading. - Click
Save & Apply.
- Go to
- Connect your computer back to your home network.
- Go to the IP you saved - remember to add the port number
:81. - You’re done!
Install Klipper, Moonraker, and Fluidd #
- Go to
OpenWrt > Services > Terminal. - Go to the
Configtab. - Change the
Interfaceto@wwanand apply changes. - Go to the
Terminaltab. - Log in with
root(no password). - Paste and run the following commands:
cd ~
wget https://github.com/ihrapsa/KlipperWrt/raw/main/scripts/1_format_extroot.sh
chmod +x 1_format_extroot.sh
./1_format_extroot.sh
- After the command completes, run
reboot. - Wait for the reboot, then go to the terminal again.
- Run the following commands:
opkg update
opkg install ar --force-overwrite
opkg install gcc
- Run: (this might take upwards of an hour or so)
cd ~
wget https://github.com/ihrapsa/KlipperWrt/raw/main/scripts/2_script_manual.sh
chmod +x 2_script_manual.sh
./2_script_manual.sh
- Follow the installation steps and wait.
- Remove the scripts using
rm *.sh. - Reboot.
- You should now be able to access Fluidd using the IP of your printer.
Flash Klipper on the Printer #
If you want to use the binary compiled by me, you can skip to step 7.
- On your computer’s terminal (not OpenWrt terminal), clone the repo:
git clone https://github.com/Klipper3d/klipper.git. - Navigate to the repo folder.
- Run
make menuconfig. - Select the following options:
- STM32
- STM32F401
- 64KiB bootloader
- Serial on USART1 PA10/PA9
- Save and exit.
- Run
make. - Copy
out/klipper.binto an SD Card and rename the file tofirmware.bin. (download here the compiled binary) - Ensure the printer is off.
- Insert the SD card.
- Turn on the printer and wait for it to install - the loading bar should be stuck.
- Wait a couple of minutes just to be sure. Reboot the printer. If the loading bar is frozen, you’re successful.
Setup serial communication with printer #
You can follow this tutorial, or the steps described below wich I took from there. You should be able to just skip to step 5, but I included all the steps so you can double check if you prefer.
- Go to OpenWrt terminal and run
opkg update && opkg install usbutils. - Run the command
lsusbto find your mainboard ID - something likeia86:7523(idVendor:idProduct). - Do
grep ia86:7523 /sys/bus/usb/devices/*/uevent- replace idVendor and idProduct accordingly. - Note the values of
PRODUCT: something like1a86/7523/264. - Copy and run the command block below that will create a hotplug rule:
cat << "EOF" > /etc/hotplug.d/usb/22-tty-symlink
# Description: Action executed on boot (bind) and with the system on the fly
PRODID="1a86/7523/264" #change here according to "PRODUCT=" from grep command
SYMLINK="ttyPrinter" #you can change this to whatever you want just don't use spaces. Use this inside printer.cfg as serial port path
if [ "${ACTION}" = "bind" ] ; then
  case "${PRODUCT}" in
    ${PRODID}) # mainboard product id prefix
      DEVICE_TTY="$(ls /sys/${DEVPATH}/tty*/tty/)"
      # Mainboard connected to USB1 slot
      if [ "${DEVICENAME}" = "1-1.4:1.0" ] ; then
        ln -s /dev/${DEVICE_TTY} /dev/${SYMLINK}
        logger -t hotplug "Symlink from /dev/${DEVICE_TTY} to /dev/${SYMLINK} created"

      # Mainboard connected to USB2 slot
      elif [ "${DEVICENAME}" = "1-1.2:1.0" ] ; then
        ln -s /dev/${DEVICE_TTY} /dev/${SYMLINK}
        logger -t hotplug "Symlink from /dev/${DEVICE_TTY} to /dev/${SYMLINK} created"
      fi
    ;;
  esac
fi
# Action to remove the symlinks
if [ "${ACTION}" = "remove" ]  ; then
  case "${PRODUCT}" in
    ${PRODID})  #mainboard product id prefix
     # Mainboard connected to USB1 slot
      if [ "${DEVICENAME}" = "1-1.4:1.0" ] ; then
        rm /dev/${SYMLINK}
        logger -t hotplug "Symlink /dev/${SYMLINK} removed"

      # Mainboard connected to USB2 slot
      elif [ "${DEVICENAME}" = "1-1.2:1.0" ] ; then
        rm /dev/${SYMLINK}
        logger -t hotplug "Symlink /dev/${SYMLINK} removed"
      fi
    ;;
  esac
fi
EOF
- Restart the printer.
Configure printer.cfg #
- Download the
printer.cfgfile from: https://github.com/Klipper3d/klipper/blob/master/config/printer-creality-sermoonV1-2022.cfg. - Place your
printer.cfginside/root/printer_data/config/(you can also use Fluidd to create this file). - Delete these blocks from your
printer.cfg:[virtual_sdcard],[display_status],[pause_resume](they’re included influidd.cfg/mainsail.cfg). - Add this line inside your
printer.cfg:[include fluidd.cfg]. - Under
[mcu], change your serial port path to/dev/ttyPrinter. - Do a
FIRMWARE RESTARTinside Fluidd. - Invert the direction of the Z axis in Fluidd:
Settings > Tools > Invert Z Control.
Install CR Touch #
The cable that comes with the CR Touch doesn’t match the port on the extruder head. The extruder head TOUCH port uses a JST ZH (2.0mm) 5-pin port. Since I didn’t have a replacement cable, I soldered the cable directly to the extruder board.
Here’s how it looks:

I printed the following support: https://www.printables.com/model/351100-sprite-extruder-cr-touch-mount-sermoon-v1.
After attaching the support and CR Touch sensor, I noticed it looked tilted, so I added a screw to make it parallel to the extruder.


Adjust X-Axis Limits #
Since the CR Touch is on the left side of the extruder, prevent the extruder from hitting the left wall and damaging the CR Touch.
Move the extruder to the leftmost position and record the coordinates. Subtract that from the X size of the bed.
Example for my printer and CR Touch setup:
[stepper_x]
step_pin: PA7
dir_pin: !PA4
enable_pin: !PB8
microsteps: 16
rotation_distance: 40
endstop_pin: PC4
position_endstop: 167.5
position_max: 167.5
position_min: 0
homing_speed: 50
Calibrate CR Touch #
To set up the CR Touch, I followed this video tutorial:
For Z homing using the CR Touch, modify the Z-axis settings as follows:
[stepper_z]
step_pin: PB7
dir_pin: PB6
enable_pin: !PB8
microsteps: 16
rotation_distance: 8
# Creality CR-Touch sensor:
endstop_pin: probe:z_virtual_endstop
homing_positive_dir: False
position_max: 160
position_min: -3
endstop_pin: Set to the probe virtual endstop.homing_positive_dir: Should beFalseto ensure the printer homes atZ=0.position_max: Adjusted to 160 to provide space for lowering the bed when the probe extends, related to thez_hopoption in[safe_z_home].
Configure [safe_z_home] as follows:
[safe_z_home]
home_xy_position: 167.5,0 # XY home
z_hop: 5       # Move up 5mm
z_hop_speed: 5
Level the Bed #
To physically level the bed using the CR Touch sensor and Klipper, I recommend this video:
My Current Settings #
After extensive tweaking, here are my current [bltouch] settings:
[bltouch]
sensor_pin: ^PC2
control_pin: PC3
x_offset: -36.7
y_offset: 0
speed: 5
samples: 2
stow_on_each_sample: False
probe_with_touch_mode: True
pin_up_touch_mode_reports_triggered: False
#z_offset: 0.0 # will update
And here are my [bed_mesh] settings:
[bed_mesh]
speed: 100
horizontal_move_z: 5
mesh_min: -2.7, 0
mesh_max: 130.8, 175 # May need calibration for your specific printer
probe_count: 7,7
algorithm: bicubic
fade_start: 1
fade_end: 10
fade_target: 0
printer.cfg #
Click here to reveal the config file.
# This file contains pin mappings for the Creality Sermoon V1
# with CR-FDM-v2.4.S1.200 motherboard.

# To use this config, during "make menuconfig" select the STM32F401
# with a "64KiB bootloader" and serial (on USART1 PA10/PA9)
# communication.

# If you prefer a direct serial connection, in "make menuconfig"
# select "Enable extra low-level configuration options" and select
# Serial (on USART2 PA3/PA2), which is broken out on the 10 pin IDC
# cable used for the LCD module as follows:
# 3: Tx, 4: Rx, 9: GND, 10: VCC

# Flash this firmware by copying "out/klipper.bin" to a SD card and
# turning on the printer with the card inserted. The firmware
# filename must changed to "firmware.bin"

# See docs/Config_Reference.md for a description of parameters.

[exclude_object]

[include macros.cfg]

[include KAMP_Settings.cfg]

[stepper_x]
step_pin: PA7
dir_pin: !PA4
enable_pin: !PB8
microsteps: 16
rotation_distance: 40
endstop_pin: PC4
position_endstop: 167.5
position_max: 167.5
position_min: 0
homing_speed: 50

[stepper_y]
step_pin: PB0
dir_pin: PB10
enable_pin: !PB8
microsteps: 16
rotation_distance: 40
endstop_pin:  PB13
position_endstop: 0
position_max: 175
position_min: 0
homing_speed: 50

[stepper_z]
step_pin: PB7
dir_pin: PB6
enable_pin: !PB8
microsteps: 16
rotation_distance: 8
#endstop_pin:  PB3
# Creality CR-Touch sensor:
endstop_pin: probe:z_virtual_endstop
homing_positive_dir: False
#position_endstop: 0
position_max: 160
position_min: -3

[extruder]
step_pin: PB1
dir_pin: PB12
enable_pin: !PB8
microsteps: 16
gear_ratio: 42:12
rotation_distance: 26.359
nozzle_diameter: 0.400
filament_diameter: 1.750
heater_pin: PC5
sensor_type: EPCOS 100K B57560G104F
sensor_pin: PC1
control: pid
pid_Kp: 30.090
pid_Ki: 1.875
pid_Kd: 120.735
min_temp: 0
max_temp: 290
max_extrude_cross_section: 5
pressure_advance: 0.16

[firmware_retraction]
retract_length: 0.8
#   The length of filament (in mm) to retract when G10 is activated,
#   and to unretract when G11 is activated (but see
#   unretract_extra_length below). The default is 0 mm.
retract_speed: 40
#   The speed of retraction, in mm/s. The default is 20 mm/s.
#unretract_extra_length: 0
#   The length (in mm) of *additional* filament to add when
#   unretracting.
#unretract_speed: 10
#   The speed of unretraction, in mm/s. The default is 10 mm/s.


[heater_bed]
heater_pin: PB9
sensor_type: EPCOS 100K B57560G104F
sensor_pin: PC0
control: pid
pid_Kp: 75.694
pid_Ki: 1.160
pid_Kd: 1234.759
min_temp: 0
max_temp: 90

[fan]
pin: PA5

[fan_generic side_fan]
pin: PC15

# [controller_fan controller_fan]
# In order to access the controller fan, the controller fan needs to be plugged
# in another location. See https://github.com/Klipper3d/klipper/pull/5621
# for more information.
# pin: PB4

[mcu]
serial: /dev/ttyPrinter
restart_method: command

[printer]
kinematics: cartesian
max_velocity: 200
max_accel: 2000
max_z_velocity: 5
max_z_accel: 100

[include fluidd.cfg]

# Uncomment to enable timelapse
#[include timelapse.cfg]

[output_pin CASE_LIGHT]
pin: PC14

[bltouch]
sensor_pin: ^PC2
control_pin: PC3
x_offset: -36.7
y_offset: 0
speed: 5
samples: 2
stow_on_each_sample: False
probe_with_touch_mode: True
pin_up_touch_mode_reports_triggered: False
#z_offset: 0.0 # will update

[safe_z_home]
home_xy_position: 167.5,0
z_hop: 5       # move up 5mm
z_hop_speed: 5

[screws_tilt_adjust]
screw1: 60.5, 35     #screw coordinates need to be measure for YOUR specific printer
screw1_name: front left screw
screw2: 167.5, 35
screw2_name: front right screw
screw3: 167.5, 145
screw3_name: rear right screw
screw4: 60.5, 145
screw4_name: rear left screw
horizontal_move_z: 10.
speed: 100.   #speed of travel moves between screws
screw_thread: CW-M4  #measure your bed screw m3=3mm / m4=4mm / m5=5mm

[bed_mesh]
speed: 100
horizontal_move_z: 5
mesh_min: -2.7, 0
mesh_max: 130.8, 175 #this may need to be calibrated for your individual printer
probe_count: 7,7
algorithm: bicubic
fade_start: 1
fade_end: 10
fade_target: 0

[delayed_gcode my_delayed_gcode]
initial_duration: 1.0
gcode:
    # Turn on the printer light
    SET_PIN PIN=CASE_LIGHT VALUE=1

#*# <---------------------- SAVE_CONFIG ---------------------->
#*# DO NOT EDIT THIS BLOCK OR BELOW. The contents are auto-generated.
#*#
#*# [bed_mesh default]
#*# version = 1
#*# points =
#*# 	-1.946500, -1.984000, -2.006500, -2.031500, -2.034000, -2.036500, -2.054000
#*# 	-1.931500, -1.969000, -1.979000, -1.996500, -2.006500, -2.009000, -2.041500
#*# 	-1.911500, -1.944000, -1.971500, -1.986500, -2.016500, -2.009000, -2.036500
#*# 	-1.936500, -1.976500, -1.999000, -2.014000, -2.046500, -2.036500, -2.041500
#*# 	-1.934000, -1.956500, -1.989000, -2.001500, -2.026500, -2.014000, -2.039000
#*# 	-1.984000, -2.009000, -2.036500, -2.041500, -2.056500, -2.031500, -2.054000
#*# 	-1.984000, -2.031500, -2.056500, -2.079000, -2.081500, -2.061500, -2.071500
#*# x_count = 7
#*# y_count = 7
#*# mesh_x_pps = 2
#*# mesh_y_pps = 2
#*# algo = bicubic
#*# tension = 0.2
#*# min_x = -2.7
#*# max_x = 130.8
#*# min_y = 0.0
#*# max_y = 174.96
#*#
#*# [bed_mesh manual]
#*# version = 1
#*# points =
#*# 	-2.100000, -2.350000, -2.475000
#*# 	-1.925000, -2.230000, -2.450000
#*# 	-1.700000, -2.070000, -2.245000
#*# x_count = 3
#*# y_count = 3
#*# mesh_x_pps = 3
#*# mesh_y_pps = 3
#*# algo = lagrange
#*# tension = 0.2
#*# min_x = 5.0
#*# max_x = 170.0
#*# min_y = 5.0
#*# max_y = 170.0
#*#
#*# [bltouch]
#*# z_offset = 0.960